Banff Highline Backpacking Trip
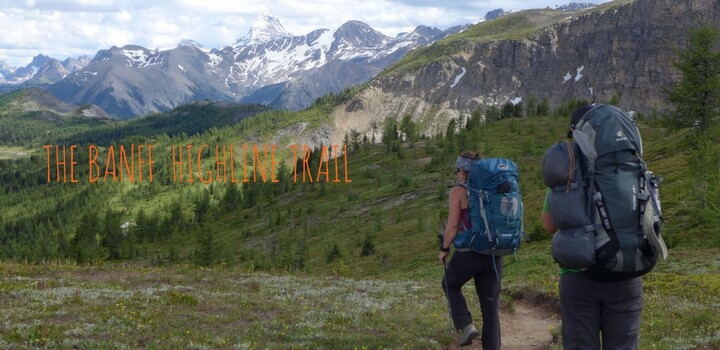
The Banff Highline
The Banff Highline trail is a network of trails in Banff National Park linked together. The route, which spans over 100 km and is typically done from west to east, will take you through douglas fir, larch forests, over alpine passes, by sparkling alpine tarns, and through endless alpine. The route is recommended due to the large amount of alpine hiking and amazing scenery. There are few sections that are in the forest where you don’t get any views.
The nice thing about this trip is it can be shortened if time is lacking. The trip can be done from, or finished at Sunshine Meadows. We rushed through the trip in only 4 and a half days. It simply wasn’t long enough! Every evening we were very tired from hiking more than 7 hours each day, our feet were sore and we had no time for any auxiliary side trips. Side trips are recommended, particularly out of Assiniboine where there are numerous trails, lakes and summits to explore.
Transportation & Logistics
The trip is point to point, so it does require a shuttle, which takes a few hours to complete. Drop one car off at Shark Mountain day use area off of the Spray Lakes Road, which becomes the Smith Dorrien – Spray Trail (highway 742), a well maintained gravel highway. Turn right off Spray Trail at the turnoff for Engadine Lodge after about 37 kilometers from Canmore. The trailhead is located approximately 5 kilometers further down the road. It is well marked so just follow the signs.

The fact that the trip is point to point is a bit more work given the need to deposit two vehicles, but that makes it more interesting, and rewarding, as you’re not walking on the same trail twice. As you hike, each day the scenery and forest will change slightly. You’ll notice the subtle differences in forest vegetation, from lush and thick at the beginning to very dry past Sunshine Meadows. This trip is highly recommended for it’s diverse scenery and passes and number of kilometers spent walking at treeline or above.
Quick Stats
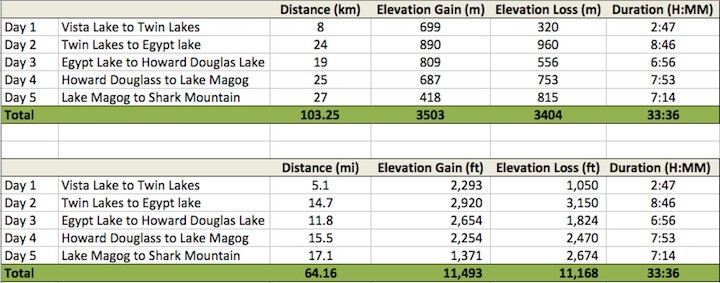
We took all the tools to be able to record all the accurate stats for the hike! So here is the most precise breakdown:
Total Distance: 103 km (64 miles) | Elevation Gain: 3503 m (11,493 feet) | Elevation Loss: 3404 m (11,168 feet)
Duration: 5 Days. 33 hours of hiking including breaks.

Our Trip Itinerary
Day 1
Distance: 8.2 km | Elevation Gain / Loss: 699 m / -320 m | Duration: 2 hours 47 minutes (including breaks)

The first day started off with grocery shopping and shuttling the vehicles from one end to the other. We began the short hike in the afternoon. Though it’s only a short distance, there is considerable elevation gain even just to get to Twin Lakes. If you had a full day, we recommend hiking to Shadow Lake, which will take a few hours longer and take you over beautiful Gibbon Pass on your first day.
The trail to Twin Lakes is very scenic. First, you drop down to Vista Lake, where you begin a long climb up to Arnica lakes and over Arnica Pass (2285 m, 7497 feet). A short descent will lead you to the Twin Lakes campsite, which is in the forest and doesn’t offer any great views. However, the campground has a large picnic table for big group meals, an outhouse, and many bear poles for storing your food.
no images were found
Twin Lakes arguably also has some of the nicest camping spots on the entire trek. They are private, isolated and there aren’t very many people there. There are only spaces for 5 or so tents, but each tent spot has a nicely levelled, and very private camp pad away from other sites and nicely forested.
Day 2
Distance: 23.7 km | Elevation Gain / Loss: 890 m / -960 m | Duration: 8 hours 46 minutes (including breaks)

We were meeting the rest of our group on the second day, who were planning on hiking to Egypt Lake in one big day. After a nice, relaxing morning with plenty of coffee and reading, they arrived at Twin Lakes at 11 and we set off over Gibbon Pass. The trail up to Gibbon Pass is stunning and very scenic. The route is mostly in a larch forest and on a side note, would be gorgeous in the fall, when the larch trees turn golden yellow. The top of the Pass is a great spot for a break if you don’t mind a little wind. The trail then meanders down to Shadow Lake. Make sure to get a look at Shadow Lake Lodge, a wonderful backcountry luxury cabin.
no images were found
The hike continues along a stream for a few kilometers and passes Shadow Lake, then gradually continues in the forest to Ball junction. After Ball junction, we start a gradually uphill climb towards Whistling pass. The trail here passes a few marshes and there is plenty of water available here if you need it. The trail is called Whistling pass due to the large number of Marmots that reside in the bouldery talus. Highly social, you’ll likely hear them whistling to announce to the rest of the marmots that you’ve been spotted. They are cute, curious creatures who like to have a good look at you from a safe distance.

After the pass, the trail continues on a long, and seemingly endless after a long day, descent down to Egypt lake campground. This is the second busiest campground on the trek after Lake Magog. Egypt Lake shelter is situated in the middle of the campground. The campground is easily accessible from Red Earth creek trail, and once you visit, you’ll see why it’s so popular. It’s a very nice spot. It’s a large campground with lots of poles to hang your food well away from the tenting area. There are also numerous picnic tables and an outhouse that looks like it’s serviced regularly.
After arriving at camp at almost 9 pm, we ate dinner and simply collapsed in our tents! Two of us hiked from Twin Lakes to Egypt Lake that day, a total of almost 24 km, but our friends, who started from the trailhead walked for almost 32 km, and climbed a total of over 1500 meters! We were all very exhausted. An earlier start was planned for the next day, but after the late night, we didn’t get up until 8 am.
Day 3
Distance: 19 km | Elevation Gain / Loss: 809 m / -556 m | Duration: 6 hours 56 minutes (including breaks)

This day we’re aiming for Howard Douglas Lake. You can also go to Porcupine from here, in a very long day and big descent. But we heard the Porcupine isn’t as nice as Howard Douglas, so we booked ourselves into Howard Douglas.
The hike out of Egypt lake starts on a gradual climb up to Healy pass. Here, you’ll pass forests of larch trees again, and amazing scenery including Pharaoh peak (2,711 m / 8,894 ft ) and your first views of Sunshine Village ski area. Great spot for a break. The last few days there are very few people on the trail, but that changes once you come over Healy pass. This area is full of tourists and day hikers checking out the impressive wildflowers of Sunshine Meadows (if you like wildflowers, check out more hikes in the U.S. for great wildflower viewing).

After going down from Healy pass and then some continuous up and down, the trail gets really awesome. The trail has been pretty great so far, so it’s hard to imagine it getting even better, but it does. You get up just above Sunshine Village ski area with panoramic views of the valley and right at treeline.
no images were found
After going past Rock Isle lake, you continue for several kilometers on open alpine meadows with great, unobstructed views in all directions. This is a great spot for wildlife. Look out for Grizzly bears – you might see one here from far away.

The trail then goes up another small pass (it’s unforgiving on the legs after all those kilometers!) and back down quickly to Howard Douglas Lake.

The campground at Howard Douglas Lake is gorgeous, and very scenic, but the word is out: so unfortunately, don’t expect any solitude here. The camp spots are all clustered very close together, and it’s usually full of people in the summer. There is very little privacy and only one large picnic table that everyone shares. There is also only one pole, meaning you’ll likely have to double up your food cache with someone else. The mosquitos are bad here in July, so insect spray is recommended.

The day had on and off rain for us all day and when we were close to settling in for the night because we were tired, a big storm whipped through and confined us to our tents for the rest of the evening. It rained most of the night but we were cosy in our sleeping bags and weren’t bothered about it.
Day 4
Distance: 24.9 km | Elevation Gain / Loss: 687 m / -753 m | Duration: 7 hours 53 minutes (including breaks)

Today we would make what is considered the “crown” of the trip, making it to Mount Assiniboine. After leaving Howard Douglas lake, we walk along alpine meadows for another few hours before topping out at Citadel Pass (~2400 m). We saw a small grizzly bear here. Make sure you grab water from one of the streams before you hike down the other side of the pass, there is no water available for hours and hours – we were all very thirsty and made a beeline for Og Lake, the first place to get water after Citadel pass!

The hike along the valley of the rocks is long, up and down, and very dry. The scenery really changes as you walk down from Citadel pass, leaving the lush forests behind and stepping into the typical dry Rockies landscape. The rockslides around here are impressive and the valleys deep.

Once you hit just above Og Lake, you’ll finally be rewarded with water and a closer view of Mount Assiniboine. Og lake campground is really nice and open, and when it’s hot, you can brave the cold waters for a swim. It was hot on our hike and we were quite dehydrated so we were tempted to jump in! It’s worth a stop. In hindsight, we wished we had spent the night at Og lake, it’s not busy and well worth a visit.

Everyone flocks to Magog lake because it’s right below Assiniboine and has the most impressive scenery of all. But it’s very crowded. The campground is first come first serve, so you really have to come in the very early afternoon to secure a spot. If not, you’ll end up in overflow (like us) and the overflow camping is completely packed with tents. There were about 40 tents alone in the small field designated for overflow.

A recommended way to do the trip is to spend the night relaxing at Og lake, then the next day make the short hike to lake Magog and secure yourself a nice campsite. Once you’re all set up, explore some of the many day hikes in the area. There are tons of hikes including The Nublet, lake Cerulean and Sunburst lakes. Next time we do the trek this will definitely be our strategy. The area is simply too nice not to explore at least a day or two. However, we were overwhelmed with the number of people at Magog lake and decided to head back the next day. Technically we could have stayed an extra day but a few in our party needed to head back.
This area is very busy due to the guests flying in by helicopter to stay at Assiniboine lodge (or at the Naisset huts or campground). When we got in, a large group of people had been deposited that afternoon, so it was very busy. July and August are a very busy time of year for the area.

The nice thing about the campground is the large amount of picnic tables and eating areas. Since the campground is so large, they really have made great amenities for everyone. And the outhouses are clean and well maintained, and even have toilet paper!
In the evening, we recommend that you head down to the shores of breezy lake Magog (bring your toque and a down jacket, it’s chilly) and watch the sunlight fade and wane over the mountain. We came down with some hot tea and rum for the evening and even watched a very brave person go in for a swim!
Day 5
Distance: 27.45 km | Elevation Gain / Loss: 418 m / -815 m | Duration: 7 hours 14 minutes (including breaks)

There are a lot of kilometers to cover on the last day. Some people break it up by spending a night at Marvel lake, which is very nice, but most opt to hike the full way out. The highlight of the trip is going up and over Wonder pass. We also saw a few more bears here, so make lots of noise. There will likely be lots of people on the trail, so if you’re concerned you can always stick together.
no images were found
The hike down Wonder pass to Marvel Lake is very nice, and scenic the whole way down. It will start to get warmer and warmer as you descend, and you’ll get pretty thirsty, but there are lots of streams to get water. It was hot, so Marvel lake looked very appealing, and we couldn’t wait to get down to the shore and take a dip. However, the trail gradually descends and doesn’t hit the shore of the lake until at the very end, so it takes some time to get there.
Your options to hike out of Assiniboine include Assiniboine pass (25 km) , Marvel pass (33 km), and Wonder pass (27 km). The quickest, and the least scenic is Assiniboine pass. However, you won’t be able to go this way unless you go before August 1 and have a group greater than four people. There is a seasonal trail closure in effect to give grizzly bears space during their busy feeding season of buffalo berries which ripen at this time. The bears are scrambling to put on weight for the winter at this time, before the night gets cold and vegetation wilts for the fall.

Soon you’ll arrive at the Bryant creek area where the stream offers another nice spot for a break or to soak sore and hot feet. We stopped for our last extended break then kept going, making our final, fairly uneventful hike back to Shark mountain. This part of the trail is definitely the least exciting, especially after all the scenic hiking on the trip. There is even a small hill that seems endless close to the very end, right before you come out to the cross country ski trails. After that, it’s a short trip back to your car.
When to go
Because of the high mountain passes and feisty weather in the region, the trail is usually not recommended until well into July. If you want to go earlier, try after mid-June, giving the snow some time to melt. Be prepared to encounter some snow patches and high creek crossings, and perhaps some mud and soggy ground. The trail is also recommended well into September: there are far less people, and the turning autumn colours are stunning, particularly the turning of the larch trees on Gibbon Pass and Sunshine meadows!
Water
On most parts of the trail, there are streams everywhere and drinking water is easy to get. Though some of the streams in the high alpine are safe, it’s recommended that you treat all your water due to the high number of bears, mountain goats, and rocky mountain sheep, among other mammals, in those areas. There are a lot of ways you can treat your water: check out our comprehensive list of water purification options.
Of note, the section of trail after Citadel Pass down to Porcupine and Og Lake is very, very dry. There are no streams or easily accessible water along the way once you leave the campground. If you’re hiking from Howard Douglas Lake, make sure you fill up your bottles before dropping down to Citadel pass. We skipped the Porcupine campground, and left Howard Douglas lake in the morning with little water, not knowing it would be hard to find it along the way. We were out of water halfway down Citadel pass,
Food Cache
This is the heart of grizzly and black bear country, so bear precautions are necessary. Aside from making noise and hiking with bear spray which can prevent an unwanted encounter, it’s important to stow your food so bears, or any other animal, can’t get to it. All campsites have plenty of poles that are available to hang your food. These poles come with a cable and caribiner so you can clip it to your bag. It’s recommended you take a dry bag to store your food. These bags will stay dry in case in rains, and help to contain odours somewhat.
The trip is through a National Park, and camping is only allowed at established campgrounds.
Campsites and booking
On the Banff National Park side, you need to book your campsites through Parks Canada. They will issue you a permit. This applies to the campgrounds of: Twin Lakes, Shadow Lake, Egypt Lake, Ball Pass, Howard Douglas Lake or Porcupine. The sites at Assiniboine provincial park (which is in British Columbia and run by the province) are first come, first serve. This includes Og Lake and Lake Magog. At the east end of the trail, if you choose to break your hike out of Assiniboine, you can stay at Marvel Lake, which is in Alberta.
Where to Stay
The most popular place to stage from is Canmore, since it offers the fastest access to both trailheads. Canmore also has more hotel rooms than Banff and it costs a bit less to stay there as well. Check out hotel deals:
Last minute rooms in Canmore, Alberta
Gear
Here is what we took for gear.
Sleeping Gear
Here is what we took: our Big Agnes UL3 tent, a Mountain Hardwear sleeping bag and a Western Mountaineering sleeping bag, which are both good to 0 degrees (32 F). We find 0 degree bags too cold for camping in the mountains, even in the summer, so next time we’ll take warmer bags. I would suggest something a bit warmer. We use the Exped Winterlite sleeping pads, which are ultralight (500 g each) and incredibly warm. The only downside to them is the fact they are pretty loud and crinkly when you are turning over, and a bit slippery. They are very warm and good down to -20 C, you can sleep right on the snow with them, so they are an overkill for summer. They inflate very quickly with a bag that is provided for that purpose.
We also like to bring along a cotton pillowcase from home. We stuff it with clothing to use it as a pillow.
Cooking
For cooking, we had our trusty, very reliable and very old, MSR Whisperlite stove. We’ve had this stove for over 10 years and it is very durable. We use it summer and winter. If you are interested, read our review of the stove here. Or compare all the backcountry stoves out on the market today. There is a lot of choice out there these days.
We bring two MSR pots with us as well, two sporks (the titanium ones are our favourites), a plastic spatula, and our plastic MSR coffee cups. If you’re not big into drinking tea, coffee or other hot liquids, you can save some weight by leaving your cup at home and simply drink out of your pot. We are big coffee drinkers and this is something we can’t go without. The cups can also be used for eating out of, for both cold and hot drinks.
Food
We like to eat nice food on backpacking trips, but on this trip, which we did with a friend who is very much into ultralight backpacking, realized that we were hauling around a lot more weight than our friends.
We ate rice with sausage, macaroni and cheese also with sausage, indian curry with rice, and a dehydrated dinner on one night only. For breakfast we ate eggs from a carton on the first day, and oatmeal with coconut flakes and nuts, and polenta (corn meal) with nuts, syrup, nuts and seeds every other morning. We had plenty of deli meat that we sometimes ate in the mornings as well, since we were burning lots of calories we had strong appetites.
Resources
To track progress, we used Gaia GPS on an iPhone 6 and also the Strava phone app.
Photo Gallery


- REI Used Gear Garage Sale - October 23, 2017
- Katadyn BeFree Water Filter Giveaway - September 25, 2017
- Banff Highline Backpacking Trip - July 27, 2016
We write rarely, but only the best content.
